How to Backup iPhone/iPad to Computer with Ease
Don’t know the correct and fast way on how to back up the iPhone? This guide will tell you how to backup iPhone to computer in 4 ways, you can choose the most efficient one according to your needs.
iPhone Backup Tips
Backup iPhone Data
iPhone Backup Locations
Backing up your iPhone regularly is a good habit. It can be a lifesaver if you accidentally lose important data. What’s more, every time the new iOS version released, it is recommended that to backup your iPhone before the update, because the data loss happens every year after updating to new iOS version.
iTunes program is not an alien to most of us, and it is the free and traditional way to back up an iPhone beside iCloud service (if you need to backup your iPhone to the cloud base). In this guide, we will show you step-by-step instructions on how to backup your iPhone with iTunes, iCloud and an easy-to-handle iTunes alternative.
Before we start, we need to claim that this post is not only working for a specific iPhone model but also available for most iPhones and computers.
- Supported iPhone: iPhone 5/5s, iPhone SE, iPhone 6/6s (Plus), iPhone 7 (Plus), iPhone 8 (Plus), iPhone X/XS (Max)/XR, iPhone 11(Max)
- Supported Computer: Windows XP/7/8/10, MacBook, MacBook Pro, MacBook Air, iMac
Part 1. How to Backup iPhone to Computer with iTunes
iTunes is the most common ways to backup iOS devices, all you need is your computer and an USB cable. Here are the detailed steps of backing up iPhone with iTunes:
If you want to selectively transfer important files from iPhone to the computer as a backup, like Contacts, Music, Text Messages, Photos, etc., then please refer to Part 3 to get the method.
1. Download and install the latest version of iTunes on your PC or Mac. Here we will show you how to backup iPhone with iTunes on a Mac, and the steps are almost identical on a Windows PC.
2. Connect your iPhone to the computer and run iTunes. Click the Device tab, and choose Summary. Here you will see the Backups section. Tap on Back Up Now, and iTunes will start backing up your iPhone to Mac/PC.
3. If you want to know whether the backup process completed successfully, just check the date and time below Latest Backup.
4. And your iTunes backup files can be found in Edit > Preferences > Device. (You are not allowed to view or access your iTunes backup files here.)
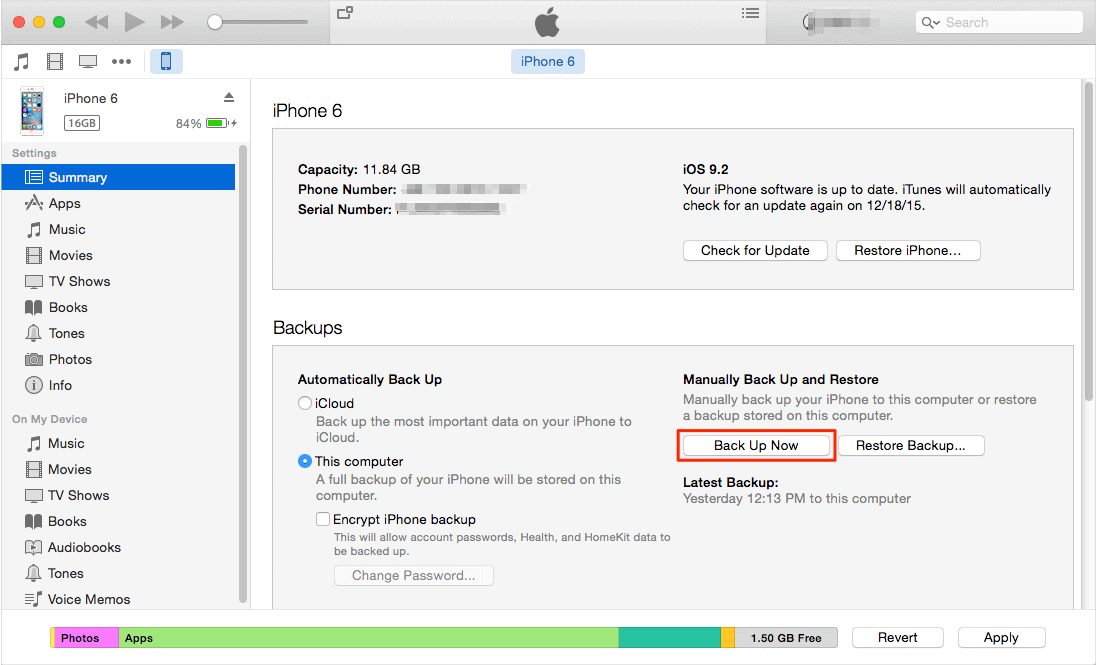
Backup iPhone to Computer using iTunes
Note:
1. iTunes gives you the ability to encrypt your iPhone backup, try to keep it in mind firmly. If you forgot the iTunes backup password, unfortunately, you’ll not be allowed to unlock your backup file.
2. The iTunes backup files are stored in your computer hard drive but are not readable. And as Apple said, an iTunes backup includes nearly all of your device’s data and settings. But notice that an iTunes backup doesn’t include:
- Content from the iTunes and App Stores or PDFs downloaded directly to iBooks
- Content synced from iTunes, like imported MP3s or CDs, videos, books, and photos
- Photos already stored in the cloud, like My Photo Stream, and iCloud Photo Library
Part 2. How to Backup iPhone to Computer with iCloud
Confused about the complicated features of iTunes and prefer to back up your iPhone with iCloud? You’ve come to the right place and we’ll show you detailed steps on how to backup iPhone via iCloud.
1. Connect your iPhone to a stable Wi-Fi network.
2. Tap Settings > your iCloud account > iCloud. If you’re using iOS 10.2 or earlier, go to Settings, then scroll down and tap iCloud.
3. Turn on iCloud Backup if it isn’t already turned on.
4. Tap Back Up Now and stay connected to your Wi-Fi network. (iCloud Backup will also occur when connected to power, locked and on WLAN.)
5. After the backing up process, you can go to check the date and time below Back Up Now to ensure the backup is finished.
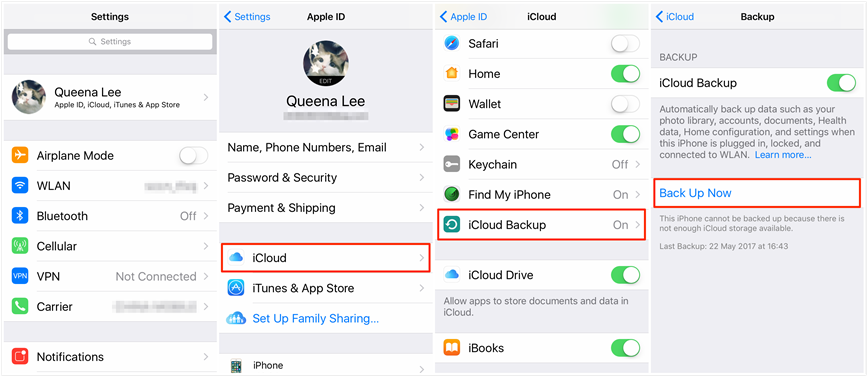
Backup iPhone 6/6s via iCloud
Your photos can take huge space on your iCloud storage while every iCloud account has only 5 GB free storage. If you need more storage to backup iPhone data, then you’ll need to pay $0.99 for 50GB, $2.99 for 200GB and $9.99 for 2TB per month. (If you purchased a 1TB monthly plan before June 5, 2017, then your account was automatically upgraded to a 2TB monthly plan.
Part 3. How to Backup iPhone to Computer with AnyTrans
AnyTrans for iOS is the all-purpose iOS file management tool: expand your control over your iOS data beyond what is normally possible, without jailbreaking your iDevice. It is regarded as the best iTunes alternative that does a great job of backing up, transferring, and managing data on your iDevice.
With AnyTrans for iOS, you can transfer photos from iPhone to the computer, music (even the non-purchased items), videos, ringtones, voice memos, voicemail, messages, contacts, notes and more from iPhone to computer as a backup, and you can view the specific data anytime you like.
AnyTrans for iOS – iPhone Backup Tool
- No limitation in accessing and checking iPhone backups.
- Download iPhone backup wholly/selectively without data loss.
- Supports to only backup the new data that is not in the existing backups.
- Air Backup feature helps users to backup their iPhones with Wi-Fi.
Free Download100% Clean & Safe
Free Download100% Clean & Safe
Free Download * 100% Clean & Safe
Now download AnyTrans for iOS to Windows or Mac, and follow the below steps to know how to backup iPhone on your computer.
Step 1. Launch AnyTrans for iOS on your computer and plug in your iPhone to it.
Step 2. You can backup all iPhone content to the computer with a few clicks. After it is done, you can view your backup files in detail.
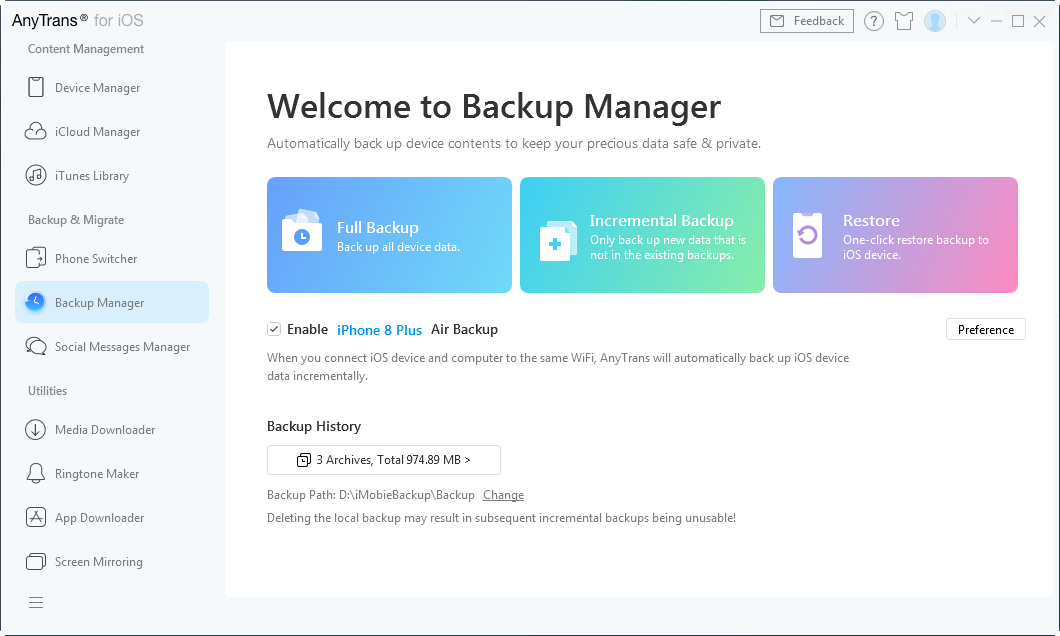
Click the Backup Manager button > Choose Full Backup to back up all device date to your computer.
How to Backup iPhone Automatically
Step 3. Alternatively, you can back up the selected iPhone data to computer with AnyTrans for iOS.
We take photos as an example. Click Device Manager > Photos > Camera Roll > Select the pictures you want to backup > Click the To PC tab on the right-hand corner.

Click Send to PC in AnyTrans for iOS – Step 3
Step 4. Use the shortcut button to backup all iPhone content to the computer.
Click the Content to PC button > Select files you need to backup from iPhone to computer > Set the destination on computer > Click “Next” button to start a transfer.
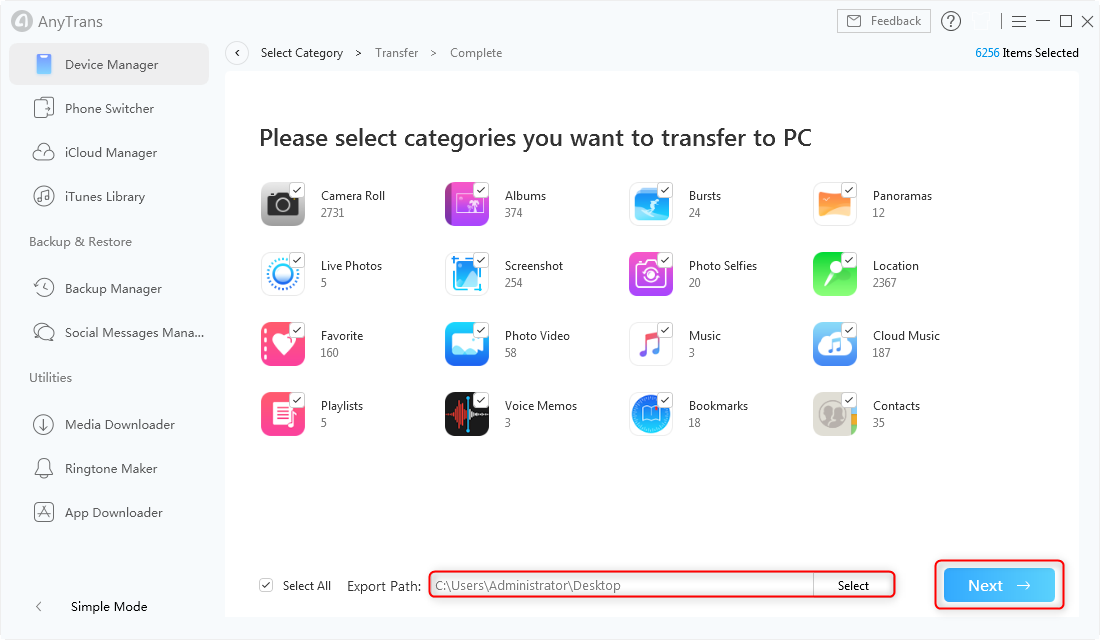
Start a Transfer in AnyTrans for iOS – Step 2
Part 4. Backup iPhone to Computer Wirelessly with AnyTrans
Besides the traditional method of backing up iPhone to the computer using a USB cable, AnyTrans for iOS now also supports users to back up their devices via Wi-Fi. If you are tired of waiting for the computer to detect your iPhone/iPad/iPod, then try this method to free yourself from the cable.
The first time you try AnyTrans Air Backup, please connect your device with the computer via USB cable. Once you have clicked the “Trust this computer” option to enable this function, you don’t need to use USB cable anymore in the future.
Step 1. Open AnyTrans for iOS on your computer. Connect your iPhone to it if it is the first time you try Air Backup.
Step 2. Click Backup Manager on the left-side menu, you will see the interface as below.

Backup Manager Interface in AnyTrans for iOS – Step 2
Step 3. Tick the “Air Backup” option, make sure your iPhone and computer are connected to the same Wi-Fi. If the Air Backup option cannot be opened, it is because you have not enabled the “Sync with this iPhone over Wi-Fi” option in iTunes.
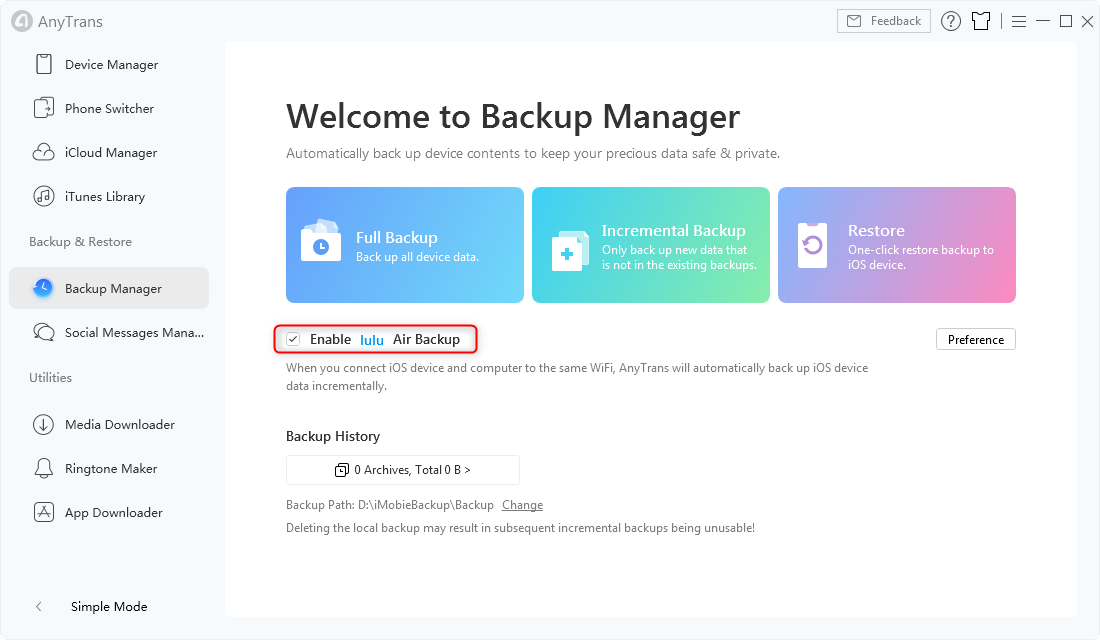
Air Backup in AnyTrans for iOS – Step 3
Step 4. You can set up the backup preference according to your needs. For example, Schedule Air Backup frequency and Enable Password Protection.
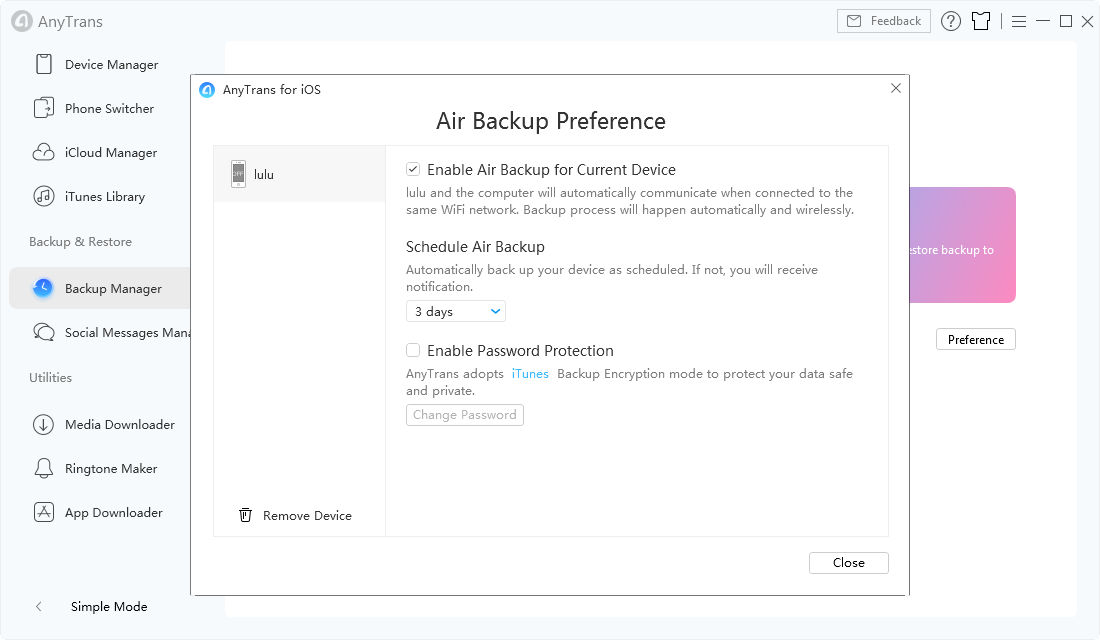
Set up Backup Preference in AnyTrans for iOS – Step 4
Step 5. Once all settings have been set up and your iPhone and computer are connected to the same Wi-Fi, AnyTrans will start to back up your device automatically. And when the backup process is finished, you could check your backup files in Backup History.
AnyTrans for iOS supports some new backup models – full backup and incremental backup now. Full backup supports users to back up all device data, while incremental backup enables you to only back up new data that is not in the existing backups, which would greatly save your computer storage. If you are interested in this backup model, just download AnyTrans for iOS and have a try.
The Bottom Line
It is obvious that AnyTrans for iOS meets all your needs on backing up an iPhone to the computer. It also helps transfer data between two iDevices, which allows you to move all data from an old iPhone to a new iPhone easily. Now start taking a tour >

Member of iMobie team as well as an Apple fan, love to help more users solve various types of iPhone related issues.
Product-related questions? Contact Our Support Team to Get Quick Solution >
