How to Transfer Ringtones from iPhone to PC or Mac Computer
Summary
Want to transfer ringtones from iPhone to computer (Windows or Mac)? Read this guide to make it with AnyTrans, which enables you to copy purchased tones between iPhone and iTunes/computer.

Nov. 25, 2016
by Joy
Follow @iMobie_Inc

AnyTrans – Quickly Copy Tones from iPhone to iTunes on PC/Mac 
AnyTrans – Best iPhone Ringtones Transfer
AnyTrans help you easily and quickly transfer purchased tones between iPhone and iTunes/Mac/PC and even another iPhone. Support any iPhone in iOS 9/8/7/6/5, including iPhone SE/6/6s/5/5s/4s.
Question: How do I transfer/sync purchased iTunes ringtones from my iPhone to my computer? I've found a lot of answers here on how to sync from computer to phone--that I know how to do. But doing just the opposite? There does not seem to be an intuitive solution.
--A user from Apple Support Communities
Analysis: Most of us like to download or purchased some ringtones on iPhone because we need a unique ringtone to remind us of coming calls. But a lot of custom ringtones stored in iPhone can take up your limited storage. So transferring those ringtones from iPhone to computer or iTunes library as backup and then deleting them from your iPhone is a good way to free up storage. How to transfer your ringtones including the non-purchased ones from iPhone to computer or iTunes?
Solution: Don't worry; in this iMobie guide we will discuss a simple iPhone to computer method to transfer ringtones from iPhone to computer.
Tools You'll Need
- A computer
- An iPhone with USB cable
- An iPhone manager - AnyTrans
AnyTrans, is an all-in-one iOS content manager that aims to transfer and manage kinds of iOS files on iPhone, iPad, and iPod. It allows you to transfer ringtones from iPhone to computer, to iTunes, and to another iOS device. Moreover, it extracts the content of iTunes and you can export the ringtones, movies, and music to iDevice without erase.
You may like: How to Transfer Tones from iPhone to iTunes
Transfer Ringtones from iPhone to Computer with AnyTrans
There are two versions of AnyTrans to choose: Windows & Mac. Download and install it on your computer then follow below steps to complete transferring ringtones from iPhone to computer.
Step 1. Run your AnyTrans on computer > Connect your iPhone on computer > Click  .
.
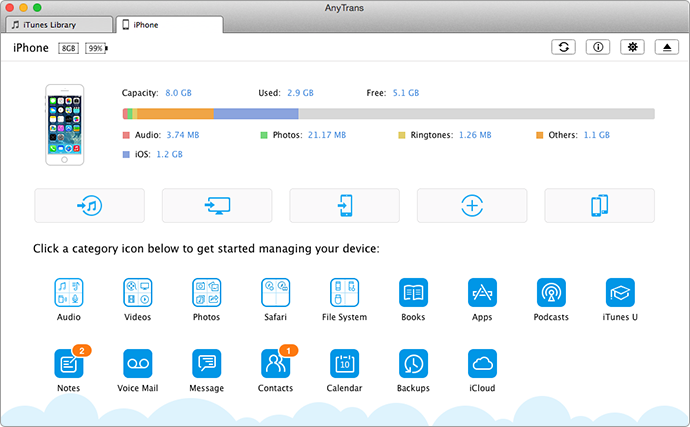
How to Transfer Ringtones from iPhone to Computer – Step 1
Step 2. Now click "Audio" and choose "Ringtones" to the next page.
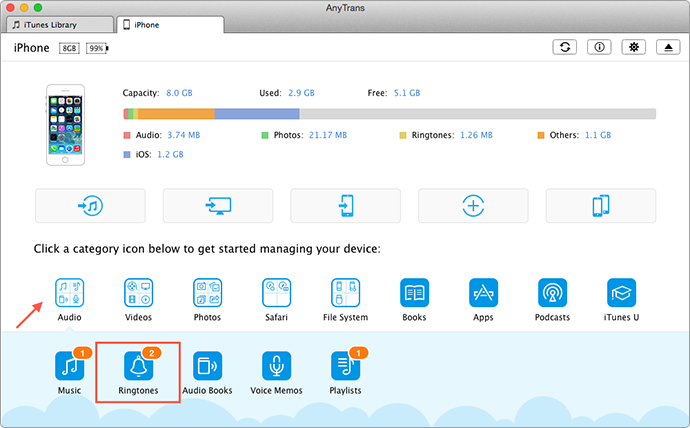
How to Transfer Ringtones from iPhone to Computer – Step 2
Step 3. Select the items you want to export from your iPhone to computer, and then click "To Computer" button to start transferring.
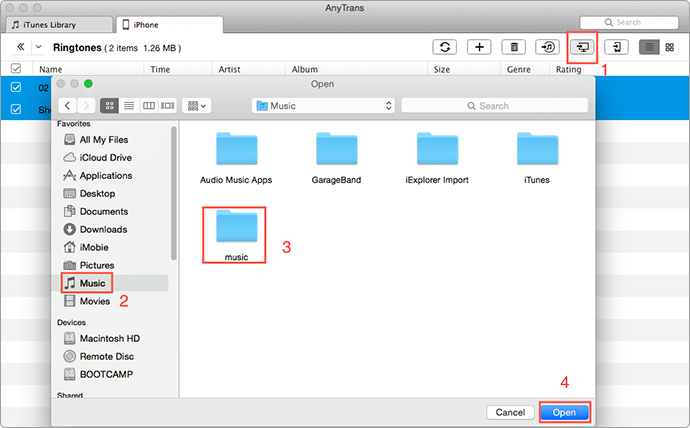
How to Transfer Ringtones from iPhone to Computer – Step 3
By using the menu bar on the top-right corner of the above screenshot, you can put ringtones on iPhone, delete selected ringtones, and transfer tones from iPhone to iTunes or to another iPhone.
Need read: How to Delete Ringtones from iPhone >
The Bottom Line
Using AnyTrans to transfer ringtones from iPhone to computer, you won't worry about data loss any more. Go to download AnyTrans. For this guide if you have any suggestion we are appreciated that you can send us email or give comments in below section.
What's Hot on iMobie
-
New iOS Data to iPhone Transfer Guidelines > Tom·August 12
-

2016 Best iPhone Data Recovery Tools Review >Joy·August 27
-

2016 Best iPhone Backup Extractor Tools > Tom·August 16
-

How to Recover Deleted Text Messages iPhone > Joy·March 17
-

How to Transfer Photos from iPhone to PC > Vicky·August 06
More Related Articles You May Like
- How to Transfer Ringtones from iPhone to iPhone – This guide can teach you how to transfer ringtones from iPhone to iPhone. Read more >>
- How to Set a Ringtone on iPhone – This guide can teach you how to set your own ringtones. Read more >>
- How can I Transfer Music from iPod to iPhone – This guide makes you know how to transfer loved music from iPod to iPhone. Read more >>
- How to Delete Ringtones from iPhone – You can easily delete the ringtones you don't like after reading this guide. Read more >>
- How to Transfer Music from iPhone to Computer – Read this guide to see how to transfer music from iPhone to Mac/PC. Read more >>