Transfer Voice Memos from iPhone/iPod to iTunes in Two Ways
Summary
How to transfer voice memos from iPhone to iTunes? Read on this post to sync voice memos from iPhone or iPod to iTunes in 2 ways.

Jan 12, 2015
by Joy
Follow @iMobie_Inc

AnyTrans - Transfer Voice Memos from iPhone to iTunes 
AnyTrans - No.1 iPhone/iPad/iPod Manager
AnyTrans allows you to transfer voice memos and more to iTunes, to computer, and to another iDevice. Take a tour with AnyTrans after reading this guide on how to transfer voice memos from iPhone/iPod to iTunes.
One of the overlooked but useful feature of iPod/iPhone is recording audio with the iPod touch and iPhone's built-in Voice Memos app. It can be easily used record lengthy thoughts or a flash of brilliance on the go.
If you have recorded a number of voice memos on your iPhone/iPod, you may want to sync them from your iPhone/iPod to PC as backup. However, if you're new to Apple devices and the complex iTunes program, you may find it is tricky to get voice memos from an iOS device to computer. In this article, I'll walk you through the methods to transfer iPhone or iPod voice memos to your computer: via iTunes or an iOS content manager - AnyTrans.
See Also:How to Transfer Voice Memos from PC/Mac to iPhone >
How to Transfer Voice Memos from iPhone/iPod to iTunes Using iTunes
Step 1. Download and install iTunes on your PC. Connect your iPhone/iPod via USB and launch iTunes.
Step 2: Click the Device button on the top-left of this window.
Step 3: Select Music tab and then select "Include voice memos".
Step 4: Click the Sync button and iPhone voice memos will sync to iTunes.
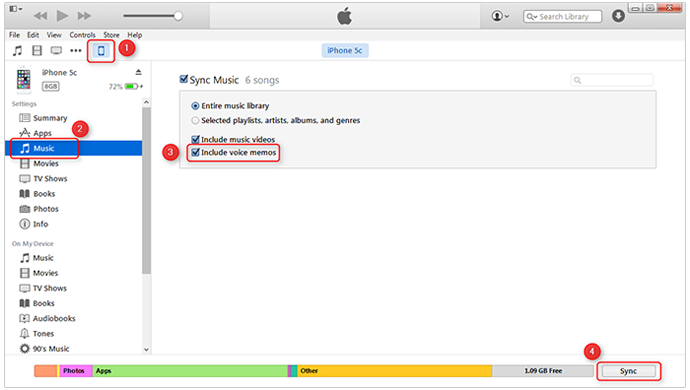
Transfer Voice Memos from iPhone/iPod to iTunes Using iTunes
Note: Once finished, the voice memos will be stored in a sub-folder called "Voice Memos" of your iTunes. You can view the recordings in the "Voice Memos" playlist that appears under the Playlists menu in iTunes.
How to Transfer Voice Memos from iPhone/iPod to iTunes Using AnyTrans
AnyTrans is far more than an iPhone voice memos transfer, it allows you to transfer almost all the iPhone content to anywhere you want, to iTunes, to computer and to another iOS device. In addition, it supports adding content like music, videos, photos to iDevice without erasing the existed data. Furthermore, AnyTrans gives you access to iCloud backup, and even download the selected items to computer, such as, contacts, messages, notes, voice mail, call history etc.
Step 1. Download and install AnyTrans, then link your iPhone or iPod to your computer via USB cable. AnyTrans will show you the storage condition and the content of your phone.
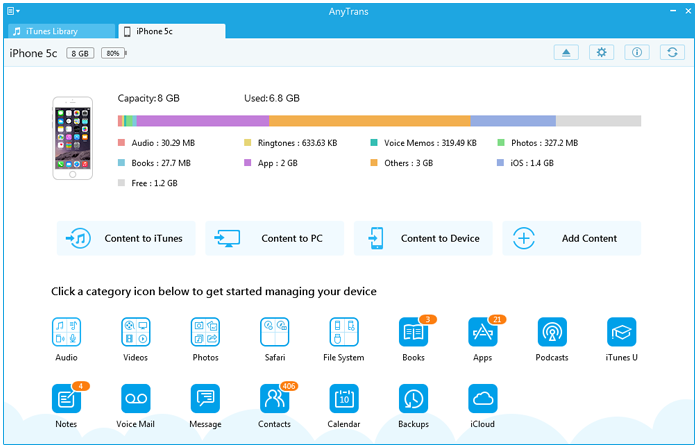
Transfer Voice Memos from iPhone/iPod to iTunes Using AnyTrans - Step 1
Step 2. On the homepage of AnyTrans, click "Audio" tab. Choose "Voice Memos", and go the voice memos manage page.
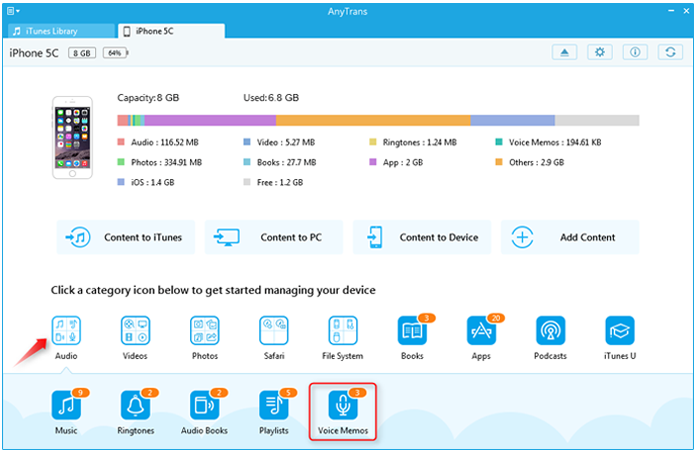
Transfer Voice Memos from iPhone/iPod to iTunes Using AnyTrans - Step 2
Step 3. Choose the voice memos you want to transfer, click the To iTunes button to start transferring.
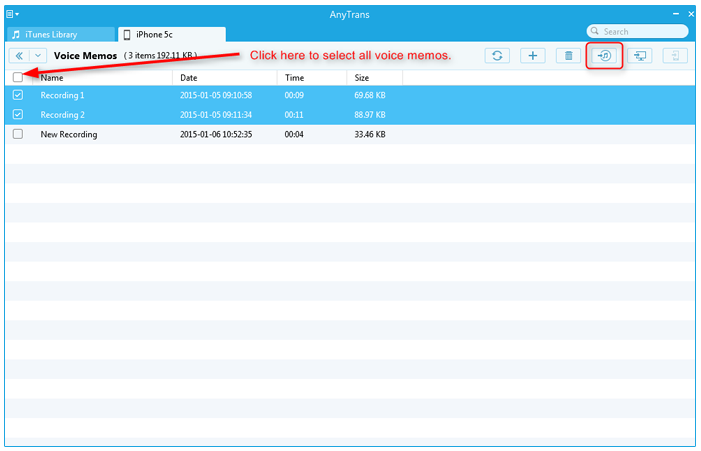
Transfer Voice Memos from iPhone/iPod to iTunes Using AnyTrans - Step 3
Also Read: How to Download Voice Memos from iPhone >
The Bottom Line
Besides transferring voice memos from iPhone or iPod to iTunes, AnyTrans allows you to sync selected items to computer and to another iDevice. Any question on this guide or AnyTrans is warmly welcomed, please be free to contact us. Download the free trial of AnyTrans now.
More Related Articles You May Like
- How to Save Voice Memos from iPhone - This guide tells you how to save voice memos from iPhone in an easy and quick way. Read more >>
- How to Get Voice Memos Off iPhone - This guide tells you how to get voice memos off iPhone in an easy and quick way. Read more >>
- How to Transfer Voice Memos from iPod to PC - Here you can find out how to get voice memos form iPod to computer. Read more >>
- How to Transfer Voice Memos from iPhone to Mac - You can get two solutions to transfer voice memos from iPhone to Mac. Read more >>