7 Ways to Transfer Photos from iPhone to MacBook Air/Pro/iMac
How to transfer photos from iPhone to Mac, MacBook or iMac? Read this post to know 7 ways to easily import photos from iPhone to Mac. It also supports importing photos from new iPhone XR and iPhone XS (Max).
- Français
AnyTrans for iOS – iPhone to Mac Transfer Tool
Download AnyTrans for iOS on your Mac computer, like iMac, MacBook Pro/Air, Mac Mini or Mac Pro firstly, and then follow us to transfer multiple or all photos from iPhone to your Mac with a few clicks. Supports all iPhone models.

It is a real pleasure to build your photo library with your iPhone by capturing photos, saving images from Apps and taking screenshots. However, as photo collections grow, you will find more and more storage is taken by Photos & Camera, even it becomes the biggest one. At this moment, many of you might choose to transfer photos from iPhone to Mac/PC computer for backup and then delete them to free up iPhone space.
Here in this post, we will focus on how to transfer photos from iPhone to Mac computer, like iMac, MacBook Pro/Air, Mac Mini, Mac Pro in 7 ways, including Photos, AirDrop,iCloud, Preview, Image Capture, Email, and an iOS photo transfer. Just keep reading!
Part 1: How to Transfer Multiple/All Photos from iPhone to Mac with AnyTrans for iOS
To get photos from iPhone to Mac you can have a try on a professional iPhone photo transfer tool – iMobie AnyTrans for iOS:
- Supports Transferring All Photos – including photos in Camera Roll, Photo Stream, Photo Library or My Albums, etc.
- Super Fast Transferring Speed – transfer almost 588 photos from iPhone to Mac within 1 minute, that is to say, it will only take you about 5 minutes to transfer 3000 photos from iPhone to Mac.
- No Harm to the Picture Quality – all pictures you transferred from iPhone to Mac computer will be kept in original picture quality.
- Offers You Two Options When Transferring iPhone Photos to Mac – supports one-click transfer and selectively transfer photos from iPhone to Mac.
- All Photos Will Be Well Organised – all photos you exported from iPhone to Mac computer will be listed according to the Album, preventing you from a great mess.
- Transfers Photos from iPhone to Mac in Other Formats – you can import live photos from iPhone as MP4/M4V, export Heic photos to JPG to a computer.
- 100% Safe and Secure – AnyTrans for iOS is developed by an Apple-trusted developer. You have our guarantee that accidents like data loss or information leakage would never occur.
Free Download * 100% Clean & Safe
After downloading and installing AnyTrans for iOS on your iMac, MacBook Pro/Air, Mac Mini or Mac Pro, and no matter which device you are working with, like iPhone 3GS/4/4s/5/5s/5c/6/6s/SE/7/8/X or the latest iPhone XR/XS (Max), all you need to do is following us to import multiple or all photos from iPhone to Mac with the detailed guides below.
Guide 1: How to Transfer All Photos from iPhone to Mac at 1-Click
If you want to transfer all the photos on your iPhone, like Camera Roll photos, Photo Stream photos, iTunes synced photos, iCloud sharing photos, and album photos, or all the photos of some specific album to your Mac, you can follow us to make it at one click.
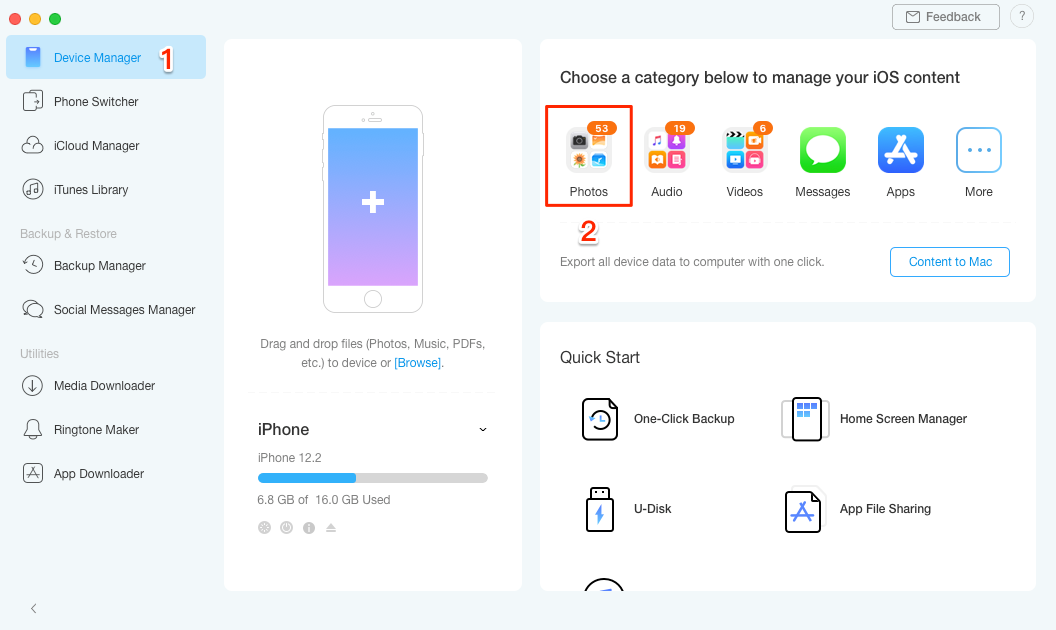
Step 1: Download AnyTrans for iOS on your Mac > Run it > Connect your iPhone to the computer via USB cable > Click on “Device Manager” mode, and then choose the “Content to Mac” option.
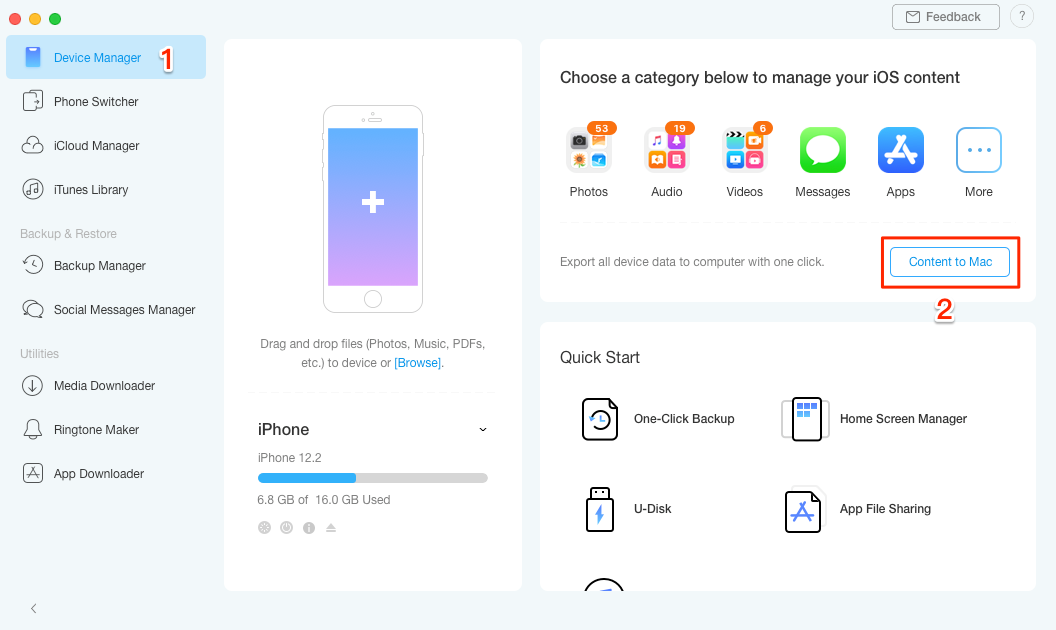
How to Export All Photos from iPhone to Mac with AnyTrans – Step 1
Step 2: Uncheck the “Select All” box > Check the categories contain photos > Click on the “Next” button to start transferring.

How to Export All Photos from iPhone to Mac with AnyTrans – Step 2
Step 3: After the process completes, just check the “View Files“ button to check the transferred photos on your Mac.
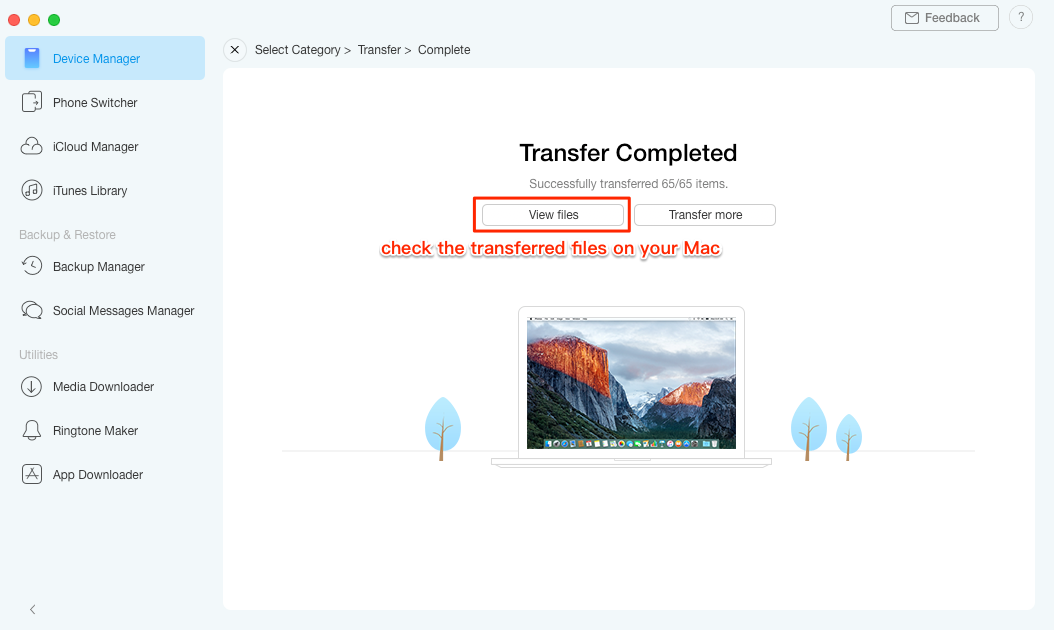
How to Export All Photos from iPhone to Mac with AnyTrans – Step 3
Guide 2: How to Transfer Multiple or Selected Photos from iPhone to Mac
If you just want to transfer some specific photos of some album to Mac instead of all the iPhone photos or the whole album, you can follow us to transfer multiple or selected photos from iPhone to Mac.
Step 1: Download and install AnyTrans for iOS on computer > Connect your iPhone to the computer via USB cable > Click on “Device Manager” mode, and then choose the “Photos” option.
How to Transfer Selected or Multiple Photos from iPhone to Mac with AnyTrans – Step 1
Step 2: Choose the album contains the photos you need > Select photos you want to transfer > Click on the “To Mac“ button at the top-right top corner to transfer the selected photos to your Mac.
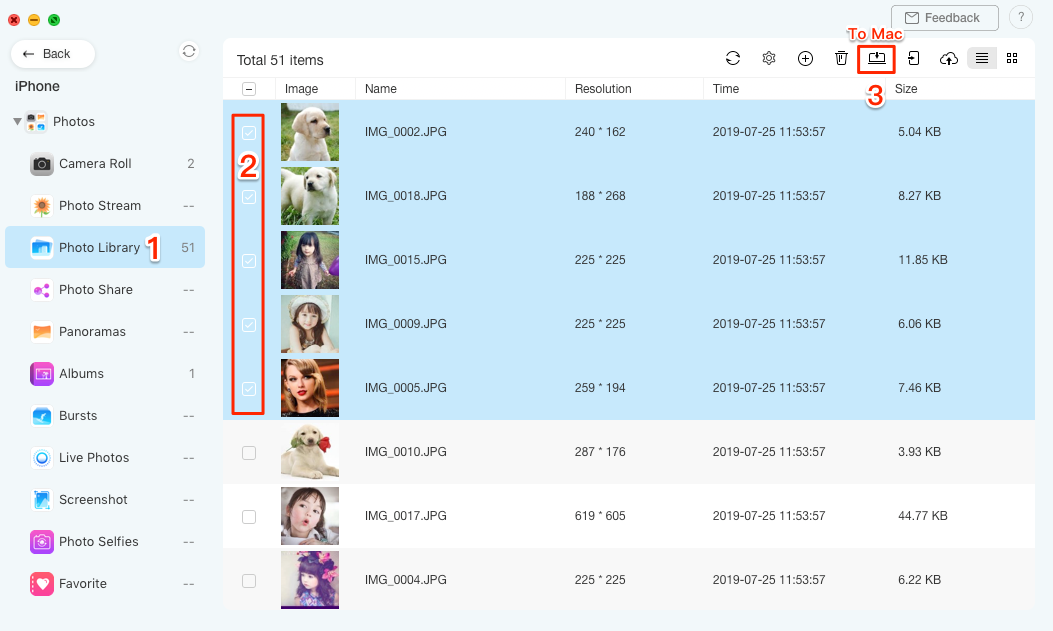
How to Transfer Selected or Multiple Photos from iPhone to Mac with AnyTrans – Step 2
Bonus Part. How to Transfer Photos from iPhone to Mac Wirelessly
If there is no USB cable available or your iPhone cannot be recognized by your computer, then you can try the AnyTrans app to transfer photos from iPhone to Mac wirelessly.
Now connect your iPhone with Wi-Fi and do as the following steps:
Step 1. Install AnyTrans app on your iPhone. You can download it by clicking the below button or directly search AnyTrans on App Store.
Step 2. On your computer, enter anytrans.io in your browser, and you’ll see a QR code.
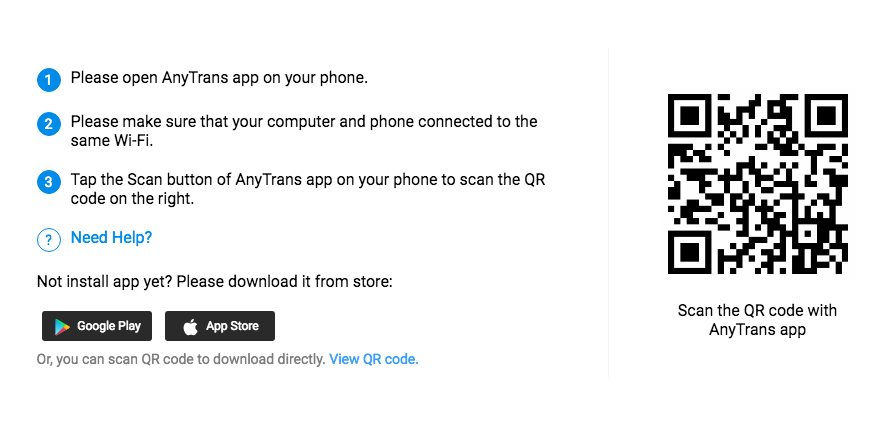
How to Transfer Photos from iPhone to Mac Wirelessly – Step 2
Step 3. On your iPhone, open the AnyTrans app you just installed and tap on the Scan button to scan the QR code on your computer.
Step 4. Then all your iPhone photos will show up on the computer. Select the photos you want to transfer and click the “Download” button to start transferring photos from iPhone to Mac. After the process completes, you can check them by going to Finder on your Mac > Downloads.

How to Transfer Photos from iPhone to Mac Wirelessly – Step 4
- For iPhone 7 or later users who want to convert HEIC to JPG, please click settings button to set it or using hassle-free HEIC to JPG converter to change these photos to JPG format on your computer.
- When syncing photos from iPhone to Mac with AnyTrans for iOS, you won’t lose any previous photo on your iPhone.
- This method also can be applied to transfer photos from iPad to Mac or iPod touch to Mac.
Part 2: How to Import Photos from iPhone to Mac with iPhoto/Photos App
For Mac OS X Yosemite earlier, you can use iPhoto on Mac to import photos from iPhone to MacBook/Air/Pro/iMac.
Step 1Connect your iPhone to Mac with a USB cable and then launch iPhoto on your Mac if it doesn’t open automatically.
Step 2 Pick up photos and click Import to import photos. You can import all the iPhone photos to iPhoto by clicking Import XXX(the number of your Camera Roll Photos) Photos or import some of them by picking up some photos and clicking Import Selected. You can add an Event Name for the imported photos before or after importing.

How to Import Photos from iPhone to Mac with iPhoto
If you are working with Mac OS X Yosemite or later, you must have found that your Launchpad has a new App named Photos, which replaces the old iPhoto and Aperture with a simpler photo editor and library manager. It also can be used to export photos from iPhone to Mac, and here we’ll show you how to make it:
Run Photos App on your Mac > Connect your iPhone to Mac with USB cable > Click Import tab > Select the photos you want to export to Mac > Click Import XX Selected or Import All Items to transfer photos to Mac.

How to Upload Photos from iPhone to Mac with Photos App
Part 3: How to Transfer Photos from iPhone to Mac with AirDrop
AirDrop enables you to transfer photos from your iPhone to your Mac. On your iPhone, swipe up from the bottom of the screen to bring up the Control Center, and then tap the “AirDrop” button. You can also turn on AirDrop from Settings app > General > AirDrop. Select either “Contacts Only” or “Everyone,” depending on who you want to be able to send the photos.
Step 1. On your iPhone, open the Photos app and find the photos you want to transfer to your Mac.
Step 2. Ensure you’re viewing the photos in thumbnail view and tap Select in the top right corner.
Step 3. Choose the photos you want to send to your Mac (selected photos appear with a blue checkmark). Then tap the Share icon (a square with an up arrow).
Step 4. In the AirDrop section, tap the name of your Mac.
Step 5. Accept the photos on your Mac and they will be saved into the Downloads folder on your Mac.

Transfer Photos from iPhone to Mac via AirDrop
Part 4: How to Transfer Photos from iPhone to Mac with iCloud
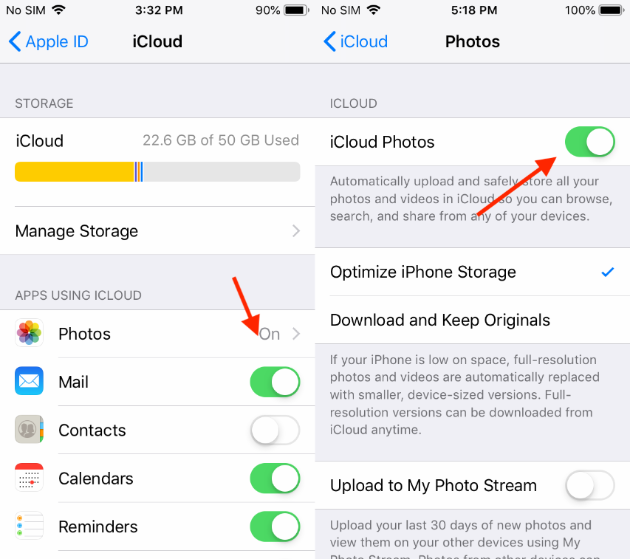
iCloud Photos is Apple’s online photo storage service. When you activate iCloud Photos, all your iPhone photos get stored in iCloud so you can view and download them from your Mac. Note that you must be signed in with the same Apple ID on your iPhone and Mac.
Step 1. On your iPhone, go to Settings > Photos. Ensure iCloud Photos is on.
Step 2. On your Mac, click the Apple icon at the top left of the screen, then go to System Preferences > iCloud. Check the box next to iCloud Photo Library (iCloud Photos in macOS Mojave)
Sync Photos from iPhone to Mac via iCloud
Part 5: How to Import Photos from iPhone to Mac with Preview
Connect your iPhone to Mac with USB cable > Launch Preview > Click File at the upper left corner of your screen > Choose Import from your iPhone > Pick up the photos you want to transfer by clicking Import or Import All > Choose destination for your iPhone photos.
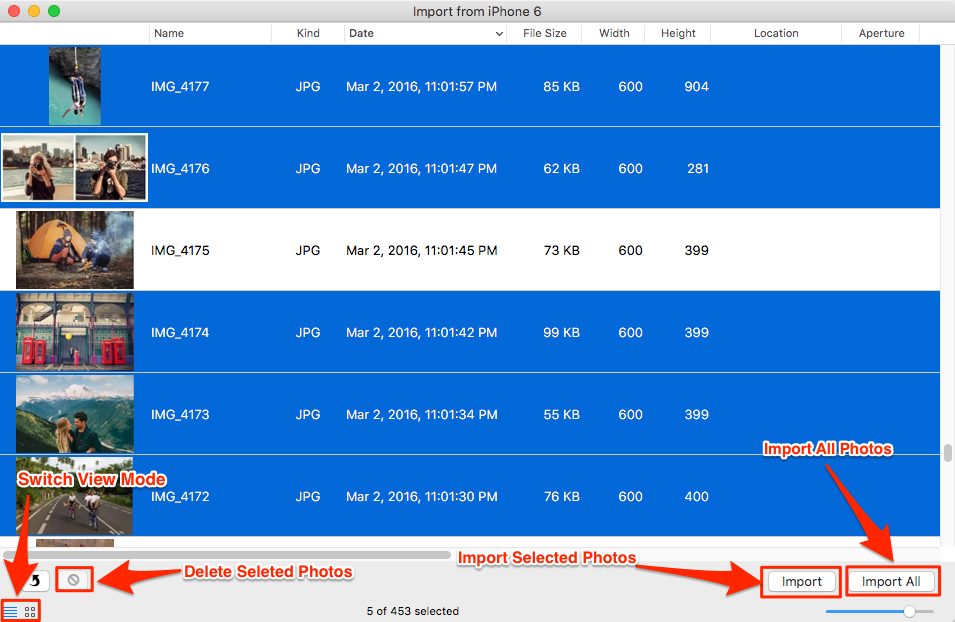
How to Get Photos from iPhone to Mac with Preview
Part 6: How to Import Photos from iPhone to Mac with Image Capture
Connect your iPhone to Mac with USB cable > Run Image Capture on your Mac > Select your iPhone from the device list if it is not selected > Set the output folder for your iPhone photos > Click Import or Import all to transfer photos from iPhone to Mac.
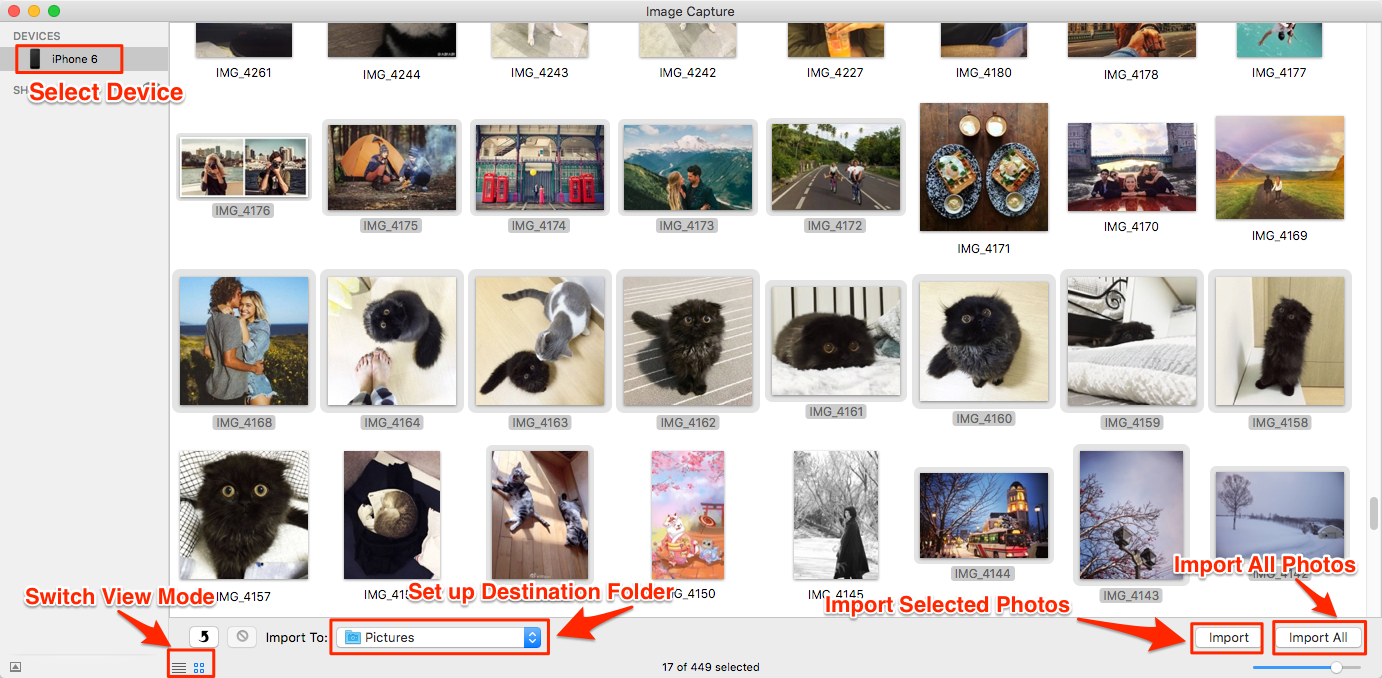
How to Transfer Photos from iPhone to Mac with Image Capture
Part 7: How to Send Photos from iPhone to Mac with Email
If you just want to transfer several photos from iPhone to Mac and your Mac is not at your hand, Email becomes a wonderful choice. So read on this post and transfer photos from iPhone to Mac with Email by following the step-by-step tutorial.
Run Photos App on your iPhone > Tap on Albums to open Albums Page > Choose the target album > Tap on Edit button > Pick up the photos you want to transfer > Tap on Share button and choose Email > Type your Email address and complete the Email > Tap on Send > Sign in your Email on Mac and download those pictures and store them on Mac.
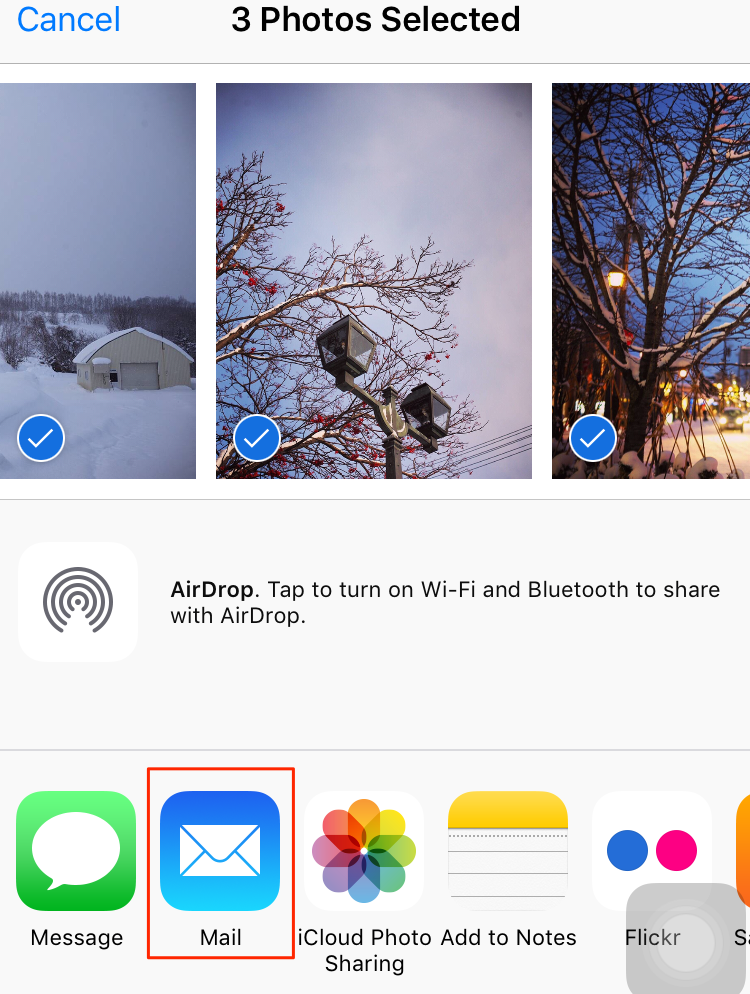
How to Send Photos from iPhone to Mac with Email
If you are working with a Windows computer, and you are looking for solutions to how to transfer photos from iPhone to Windows 7/8/10/XP/Vista, you can move to this guide: How to Transfer Photos from iPhone to Windows Computer. In addition, if you will want to transfer photos from Mac back to your iPhone, just refer to: How to Transfer Photo from Mac to iPhone >
Part 8: Comparison of Some Methods and Select the Best Solution
| AnyTrans | Photos | AirDrop | iCloud | Preview | ||
| Camera Roll Photos | ||||||
| Organize with Photo Albums | ||||||
| Convert Live Photos to GIF/Video | ||||||
| Upload to iCloud | ||||||
| Resolution | High | High | High | High | High | Equal |
| Transferring Speed | 588 Photos/min | 482 Photos/min | Depends on Wi-Fi | Depends on Wi-Fi | 323 Photos/min | 265 Photos/min |
| Compatibility | OS X 10.9 and later | OS X Yosemite and later | OS X 10.7 and later | OS X 10.10.3 or later | All Mac OS versions | All Mac OS versions |
| Availability | Free Download | – | – | – | – | – |
| Overall |
|
|
|
|
|
|
The Bottom Line
Although you can get 7 or even more ways to transfer photos from iPhone to your iMac, MacBook Pro/Air, Mac Mini or Mac Pro, most of them only support exporting Camera Roll photos. If you want to transfer photos stored in other albums, you have to search for other solutions. Just like the table above shows, when it comes to transferring and managing iPhone photos, AnyTrans for iOS is the best choice. Except for transferring photos, it also can transfer other iOS contents, like Messages, Contacts, Videos, Movies, Notes, ect., and also supports transfer data from one iPhone to another Apple device directly. Why not download AnyTrans for iOS and try it yourself >

Member of iMobie team as well as an Apple fan, love to help more users solve various types of iPhone related issues.
Product-related questions? Contact Our Support Team to Get Quick Solution >
AnyTrans ® for iOS
The best tool to transfer, backup and manage your iPhone iPad content, even iTunes, iCloud backup files. As easy as ABC!
- * 100% Clean & Safe
Users Served