How to Transfer iTunes U from iTunes to iPad
Summary
If you want to transfer selected iTunes U from iTunes to iPad instead of full sync, this article will tell you the exact solution.

Sept. 30, 2016
by Lena
Follow @iMobie_Inc

AnyTrans – Transfer iTunes U from iTunes to iPad 
AnyTrans – Your Best iPad Manager
Get AnyTrans installed on computer to manage your iPad content after reading this guide on how to transfer iTunes U from iTunes to iPad.
Through our survey, over 79% iPhone users rely iPhone / iTunes / iCloud to store their important personal data. In order to help you extract useful photos, messages, notes and more from your backup, we composed this 2016 iPhone Backup Extractor Software Review for your reference.
With iTunes U, we can learn many educational courses without attending classes. It can also save much tuition. We can download many courses from iTunes Store and watch them on computer. But there must be some times that you want to transfer some courses to your iPad so you can also watch the lectures when you are outside home. iTunes can help with that but it can erase the previous data on your device. Why not have a try on AnyTrans? It can add courses to device without data loss.
Also Read: How to Transfer iTunes U from iPad to iTunes >
Top Features of AnyTrans
AnyTrans is an all-in-one iPad/iPhone/iPod data transfer tool that can help you manage your iPad data in an easy way.
1. You can sync selected iTunes U lectures from iTunes to iPad instead of full sync. Besides iTunes U, you can also transfer music, playlists, movies, podcasts and more from iTunes to iPad directly.
2. AnyTrans will not wipe any existed data on your device.
3. It also supports transferring iPad data to another iDevice, to iTunes and computer.
Also Read: How to Transfer iTunes U from iPad to Computer >
Click here to download AnyTrans on computer and follow the steps below to sync iTunes U to iPad.
How to Transfer iTunes U from iTunes to iPad
Step 1: Launch AnyTrans > Connect your iPad to computer > Click on iTunes icon to access iTunes library using AnyTrans.
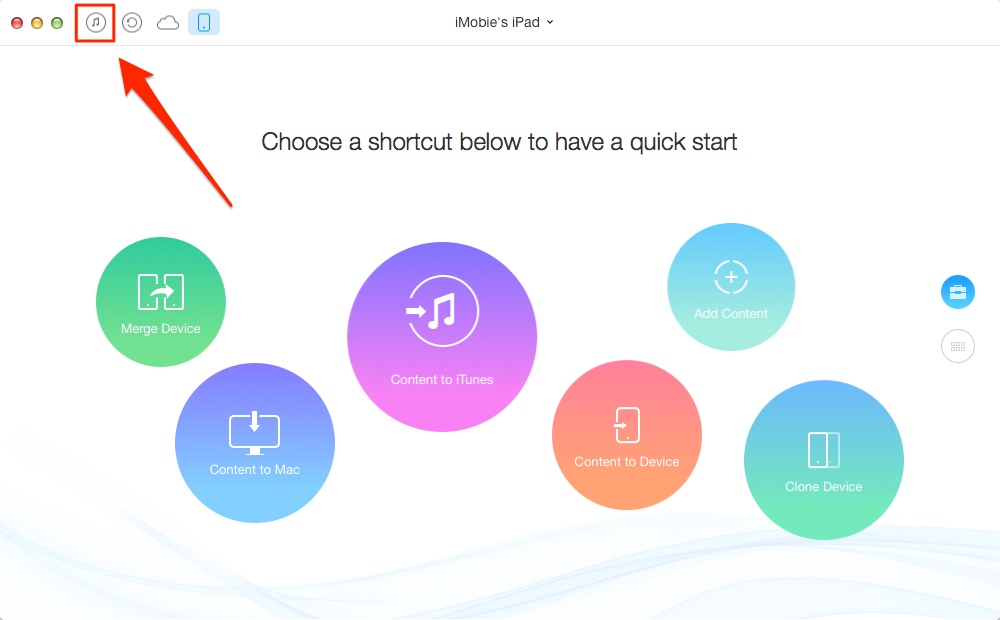
How to Transfer iTunes U from iTunes to iPad – Step 1
Step 2: Click on iTunes U > Select the courses you need > Click on To Device button to transfer them to your iPad.
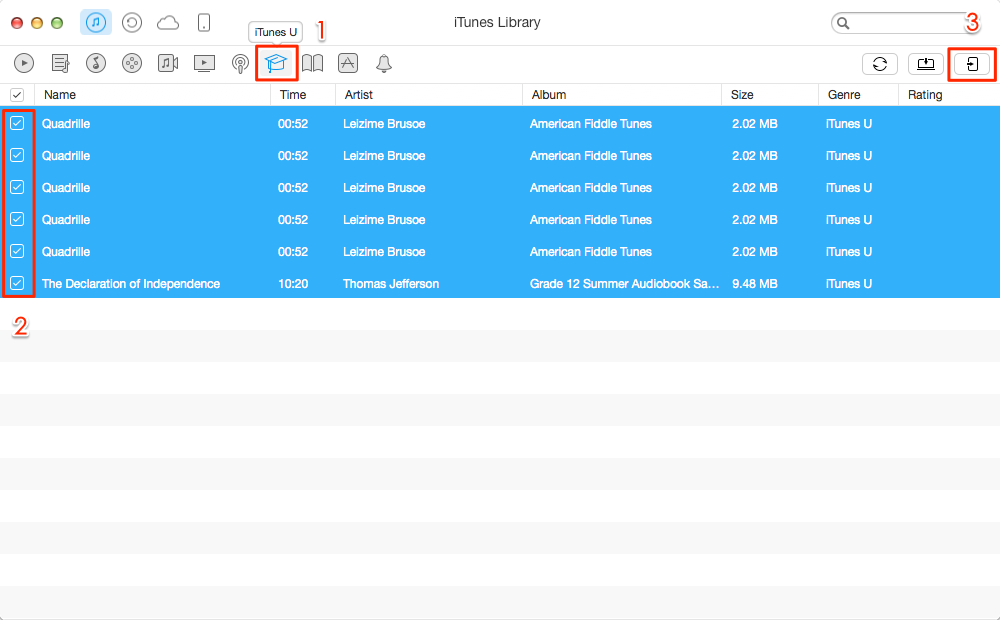
How to Transfer iTunes U from iTunes to iPad – Step 2
The Bottom Line
As you can see, with just a few clicks you can transfer iTunes U from iTunes to iPad easily. If you have any questions on this guide or AnyTrans, you can send an to tell us. We will reply to you as early as possible. Take a tour with AnyTrans now >
What's Hot on iMobie
-

New iOS Data to iPhone Transfer Guidelines > Tom·August 12
-

2016 Best iPhone Data Recovery Tools Review >Joy·August 27
-

2016 Best iPhone Backup Extractor Tools > Tom·August 16
-

How to Recover Deleted Text Messages iPhone > Joy·March 17
-

How to Transfer Photos from iPhone to PC > Vicky·August 06
More Related Articles You May Like
- How to Transfer Music from iTunes to iPad – Read this article to see how to transfer music from iTunes to iPad easily. Read More >>
- How to Transfer Podcasts from iTunes to iPad – This post will show you how to transfer podcasts from iTunes to iPad. Read More >>
- How to Transfer iTunes U from iPhone to Computer – Want to transfer iTunes U from iPhone to computer but do not know how? Read More >>
- How to Transfer iTunes U from iTunes to iPhone – Read this guide to get two methods on sync iTunes U to iPhone. Read More >>
- How to Transfer Contacts from iPhone to iPhone – Want a way to transfer from the old iPhone contacts to the new? Check this guide to learn more. Read More >>
- How to Transfer Photos from iPhone to Mac – Learn how to offload your Camera Roll photos from iPhone to your Mac in few clicks. Read More >>