How to Fix: iTunes Error 0xE8000015 with 5 Methods
Meet iTunes error 0xE8000015 when connect your iPhone to iTunes on computer? Read this guide to get 5 reliable solutions to fix the iTunes error 0xE8000015 with no hassle.
“I installed iTunes on a windows 10 laptop. My computer knows it’s an iPhone and everything is up to date. But when I want to connect my iPhone 8 to iTunes, I keeps getting “An unknown error occurred (0xE8000015)” error. Does anyone know how can I fix the iTunes error 0xE8000015?”
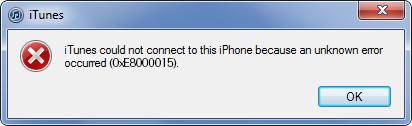
iTunes Error 0xE8000015
Recently more and more iPhone iPad users have complained to us about this iTunes error 0xE8000015 for the practical tips. So don’t be too worried, because you are not alone.
But what is the iTunes error 0xE8000015 on earth? You need to figure this out first. iTunes error 0xE8000015 is one of the most common iTunes errors, occurring with the message “iTunes error 0xe8000015” or “iTunes could not connect to this iPhone, an unknown error occurred (0xe8000015)”, when users connect their device to the computer and need to restore it with iTunes because of iPhone iPad disabled, or other situations.
And then when users encounter this iTunes error 0xE8000015, what measures can be taken to fix it? Here in the following, we will share you 5 simple yet reliable solutions to help you fix the iTunes error 0xE8000015 with ease. Check them now.
How to Fix: iTunes Error 0xE8000015
Method 1. Restart iPhone
iPhone 8 or earlier iDevices: Press and hold the Side (or Top) button until the slider appears > Drag the slider to turn off your iPhone > Wait for a few seconds, press and hold the Side (or Top) button again until you see the Apple logo.
iPhone X: Press and hold the Side button and either volume button until the slider appears > Drag the slider to turn your iPhone X off > Wait for a few seconds, press and hold the Side button again until you see the Apple logo.
Method 2. Check Connection
Many users reported that this error could be caused by the network connection problems. So, make sure that your iPhone is connected to network correctly.
Check cellular data connection: Go to Settings on iPhone > Cellular >Turn off and then on cellular data.
Check Wi-Fi network connection: Go to Settings on iPhone > WLAN > Check your iPhone is connected to a right Wi-Fi and you are within the range of the Wi-Fi network.
Method 3. Check Your iPhone have Enough Available Space
If there is not enough available space on your iPhone, you may not be able to connect iPhone to iTunes. In this way, you need to free up more space on your iPhone by deleting some unimportant items. Or you can choose to backup the files prior, and then delete them from iPhone.
To check iPhone space: Go to Settings > General > iPhone Storage.
Method 4. Disable Restriction on iPhone
If you have set a restriction on iPhone, then your iPhone is inaccessible to iTunes.
To disable restriction on iPhone: Go to Setting > General > Restrictions > Disable Restrictions and enter in your passcode.
Method 5. Reset the Lockdown Folder
The last solution works well for lots of iPhone users on fixing iTunes error 0xE8000015, as iTunes will recreate the directory again when you start the Lockdown folder after deleted the files in it.
On Windows:
Step 1 Click the magnifying glass (search). On Windows 7, click on Start. On Windows XP, click on Start and then click Run > Type %ProgramData%, and press return button.
Step 2 Open the Apple folder by double clicking on it > Delete the Lockdown folder. You need to be signed in as the administrator.
On Mac:
Step 1 From the Finder, click on Go > Go to Folder > Type /var/db/ lockdown and press the return button > Click on View as Icons to see the files.
Step 2 Select all of them and delete them. Don’t delete the lockdown folder itself. Just delete the files within the lockdown folder.
How to Restore iPhone without iTunes
Just like above, sometimes iTunes may stop working when you really need it. Actually, to recover lost data or restore iPhone, you have more choice now than ever before. PhoneRescue for iOS is recognized as the #1 iTunes alternative for iOS users to restore iPhone from iTunes/iCloud backup, and recover deleted photos, messages, contacts, notes, calendar as well as other up to 31 iOS file types.
3 highlights make PhoneRescue for iOS to be more popular than traditional iTunes recovery way: No data erase or replace needs, highest recovery success rate and 3 different recovery modes (from iPhone without backup, from iTunes backup & from iCloud backup).
Also, unlike iTunes, you are able to view the files before restore, and select the files you prefer to retrieve, not a blind full restore. No matter what you want to recover, no matter you have backup or not, it helps you recover lost files with no effort. Now, let’s check its detailed recovery steps (here we take Recover from iTunes Backup for an example).
Step 1 Download PhoneRescue for iOS and install it on your computer.
Free Download * 100% Clean & Safe
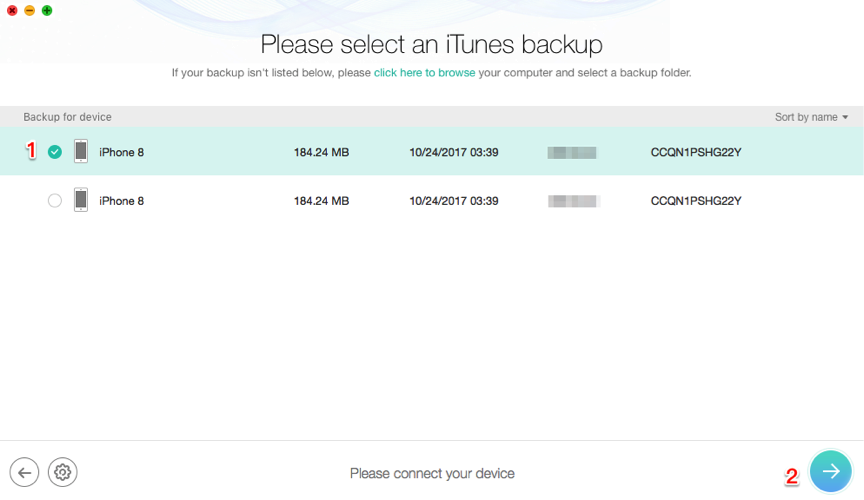
Step 2 Connect your iPhone to the computer via its USB cable > Choose Recover from iTunes Backup mode and click on Right Arrow to continue.

How to Restore iPhone from iTunes Backup without Data Erasing – Step 2
Step 3 Choose the backup contains the data you want to recover and click Right Arrow > Check the files categories and click on OK button to start the scan process.
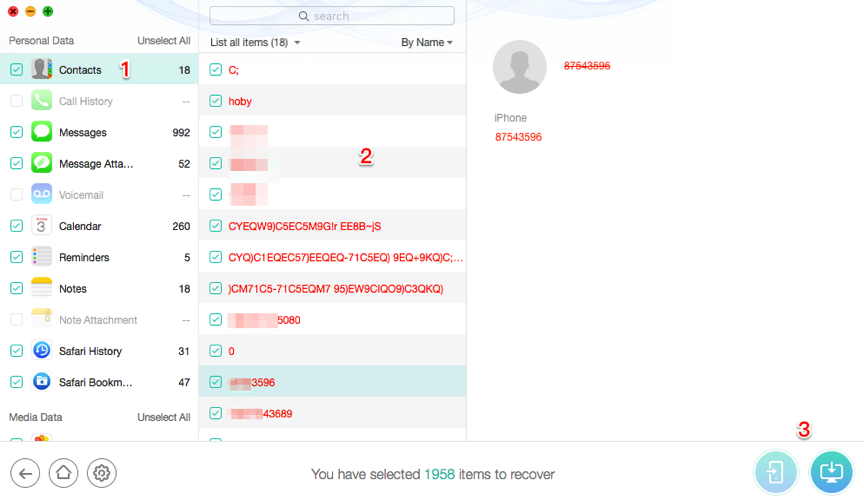
How to Restore iPhone from iTunes Backup without Data Erasing – Step 3
Step 4 Preview and select data you want to restore > Click Recover to Device or Recover to Computer button on the bottom right to start restoring selected data.
How to Restore iPhone from iTunes Backup without Data Erasing – Step 4
To recover files from iPhone directly or iCloud backup, simply refer to:
How to Recover Deleted Files from iPhone with/without Backup >
Also Read: How to Fix iTunes Error 9 >
The Bottom Line
With above 5 solutions, you may have succeeded in fixing iTunes error 0xE8000015. If you will meet other error when using iTunes or iPhone, feel free to leave them in the comment section below, and we will reply you soon. Lastly, give PhoneRescue for iOS a try to be your good assistant.
More Related Articles


Member of iMobie team, an Apple fan as well as an anime lover. Like to share solutions on iOS and Android related problems.
Product-related questions? Contact Our Support Team to Get Quick Solution >

PhoneRescue ® for iOS
Recover your deleted iPhone iPad files with the highest success rate, no matter whether you have backups or not!
Free Download- * 100% Clean & Safe
Users Served
Mentioned in Top Tech Sites:

Highly Rated by Users:
based on 7889 Customer Reviews