How to Completely Remove and Reinstall iTunes on Windows
Summary
How to completely remove and reinstall iTunes on Windows XP / Vista and / 7? We will show you a complete guide about removing and reinstalling iTunes on Windows computer.

Sep 10, 2012
by Vicky
Follow @iMobie_Inc

AnyTrans - Styles Up Music, App and Everything on Your iPhone iPad & iPod 
AnyTrans - Your Best-value iPhone iPod Manager
Download this award-winning application so that you can make use of it after reading this How to Completely Remove and Reinstall iTunes guide.
In some instances, you may not be able to use our software to find or detect your iOS devices. Based on our experience, this situation is possibly caused by that some of the iTunes components have been distorted or modified by other programs. To repair this, you may need to remove all traces of iTunes, QuickTime, and related components from your computer before reinstalling iTunes.
Don't Miss: How Can I Transfer Music from iPhone to iTunes >
NOTES:
- You may concern about the iTunes Store purchases or songs imported from CDs will be deleted. Don't worry. They are saved in your My Music folder by default and are not remove even you completely remove iTunes. However, we still recommend you to ensure that your iTunes library is backed up. If you're unsure how to backup, see iTunes: Back up your iTunes library by copying to an external hard drive.
- These iTunes removing and reinstalling steps may take a large amount of time to complete, depending on your computer system performance.
Tip 1: The current iTunes 11.1.5 for Windows (64-bit) is with 142MB file size (222MB for Mac OS X), so make sure your computer has at last 400MB of available disk space to install the iTunes 11.
Part 1: Open Control Panel, Remove iTunes and related components
Use the Control Panel to uninstall iTunes and related software components in the following order and then restart your computer:
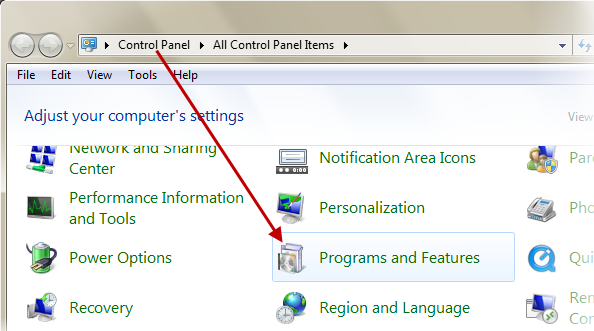
Remove iTunes and related components from Control Panel
- iTunes
- QuickTime
- Apple Software Update
- Apple Mobile Device Support
- Bonjour
- Apple Application Support (iTunes 9 or later)
Important: Uninstalling these components in a different order, or only uninstalling some of these components may have unintended affects.
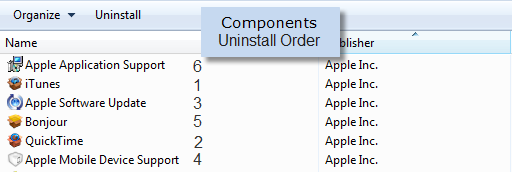
Uninstalling iTunes components in this order
Part 2: Verify iTunes and its components are completely uninstalled
In most cases removing iTunes and its related components from the Control Panel will remove all supporting files belonging to those programs. In some rare cases though, files may be left behind. After following the previous steps, you should confirm that the following files and folders have been removed. If any are left behind, remove them now:
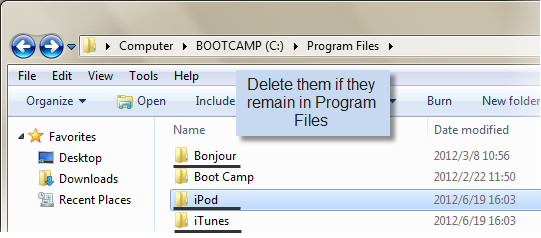
Check iTunes and components are completely uninstalled
C:\Program Files\Bonjour
C:\Program Files\Common Files\Apple\ (At times the system may keep you from deleting this folde. You need to restart computer and then remove this folder.)
C:\Program Files\iTunes\
C:\Program Files\iPod\
C:\Program Files\QuickTime\
C:\Windows\System32\QuickTime
C:\Windows\System32\QuickTimeVR
If you have a 64-bit version of Windows, you will need to confirm that the following folders have been removed as well:
C:\Program Files (x86)\Bonjour
C:\Program Files (x86)\Common Files\Apple\
C:\Program Files (x86)\iTunes\
C:\Program Files (x86)\iPod\
C:\Program Files (x86)\QuickTime\
C:\Windows\SysWOW64\QuickTime
C:\Windows\SysWOW64\QuickTimeVR
Part 3: Reinstall iTunes and related components
If the issue you are troubleshooting is not resolved after following these steps, it is not necessary to remove and reinstall iTunes multiple times. Instead, you may find helpful information on the Apple iTunes Support page, such as troubleshooting steps related to specific alert messages.
Tips 1: for Windows XP users, the detailed steps may have some differences;
2. After uninstall iTunes with the traditional way through Programs and Features in Windows Control Panel, it is very important to verify iTunes and its components are completely uninstalled;
3. Please also note that we are not sure this tutorial can 100% solve your trouble. So if there is no luck with this help page, please feel free to and let we know all details about your situation so that we can make better analysis for you.
What's Hot on iMobie
-

New iOS Data to iPhone Transfer Guidelines > Tom·August 12
-

2016 Best iPhone Data Recovery Tools Review >Joy·August 27
-

2016 Best iPhone Backup Extractor Tools > Tom·August 16
-

How to Recover Deleted Text Messages iPhone > Joy·March 17
-

How to Transfer Photos from iPhone to PC > Vicky·August 06
More Related Articles You May Like
- Free Transfer Music from iPhone to Computer - Step-by-step iPhone guide teaches you to transfer music from iPhone to PC for Free. Read more >>
- How to Transfer Music from iPod to iTunes - Watch free video guide on how to transfer the music from iPod back to iTunes library. Read more >>
- Best iPhone to PC Transfer Free - Helps you copy music and movies from iPhone back to computer. Read more >>
- Transfer Music from iPhone to iPhone - Transferring Music from iPhone to iPhone is a necessary procedure if you get a new iPhone. Read more >>