How to Transfer Photos from iPhone/iPad to Flash Drive
Summary
How to transfer photos from iPhone or iPad to a USB flash drive? Read this guide to get the easiest way to help you save photos from iPhone/iPad to flash drive on Mac/PC computer.

Sep. 22, 2016
by Joy
Follow @iMobie_Inc

AnyTrans – Directly Transfer Photos from iPhone/iPad to Flash Drive
AnyTrans – iOS Content Transfer & Manager
Download AnyTrans prior to save your time before reading this guide on how to transfer photos from iPhone/iPad to flash drive.
Question: "I want to take my photos off my iPhone 5s and place them on a removable storage device, a flash drive. I don't want the only back up to be on my Mac. Can this be done?"
-- A User from Apple Support Communities
With its amazing built-in camera, people are very fond of taking photos with their iPhone or iPad. With time and use, photos become one of the biggest consumers of your limited iOS storage. So you may want to save these photos from iPhone to USB and delete them from your device to free up space. What’s more, those wonderful photos are also part of your previous memory, so you’d better download them to a flash drive as backup like above user asks.
You cannot directly transfer photos from iPhone or iPad to a flash drive with normal Apple way, so here in this guide, we will show you how to quickly and easily transfer photos from iPhone/iPad to a USB with one powerful iOS data transfer tool called AnyTrans.
What Is AnyTrans – Main Features
- AnyTrans supports transferring photos from iDevice to a flash drive, to computer or to another iDevice directly.
- AnyTrans allows you to add photos from computer to iPhone/iPad/iPod without erasing any existed data on iDevice.
- AnyTrans allows you to manage and transfer almost all of your contents on iPhone/iPad/iPod touch, including photos, videos, music, contacts, messages, books, apps, etc.
Take a Tour with AnyTrans by Downloading It Now >
How to Transfer Photos from iPhone/iPad to a USB Flash Drive
Step 1. Launch AnyTrans, and connect your iPhone or iPad to computer. At the same time, connect your USB fash drive to your computer. After that, click  .
.
Transfer Photos from iPhone/iPad to a USB Flash Drive with AnyTrans
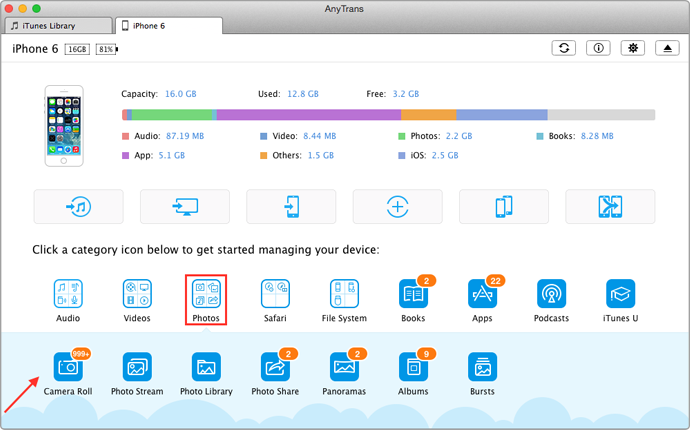
Step 2. Click on Photos tab. Choose the photos you need from Camera Roll, Photo Stream, Photo Library, Photo Share, Album, Bursts, etc.
Transfer Photos from iPhone/iPad to a USB Flash Drive with AnyTrans
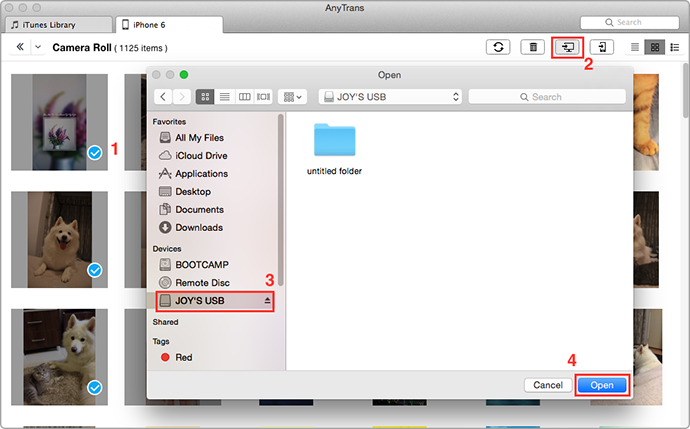
Step 3. Take Camera Roll as an example. Choose the photos you want > Click the To Computer button > Choose your USB flash drive to save the photos > Click Open button to start transferring.
Transfer Photos from iPhone/iPad to a USB Flash Drive with AnyTrans
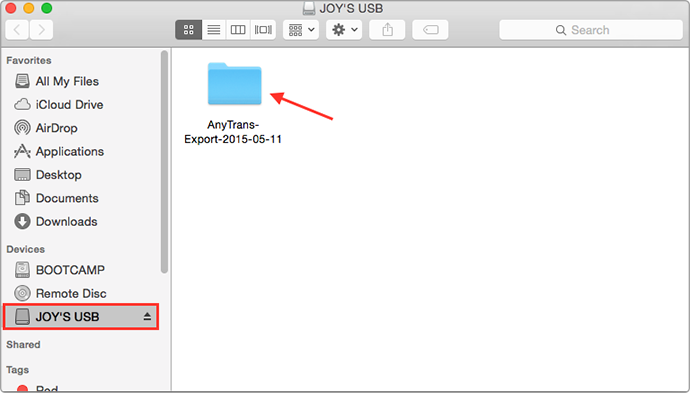
Step 4. Now go to your flash drive, and here will be a folder named AnyTrans-Export. Open the folder and you will see the pictures you have transferred from your iPhone to the USB.

Transfer Photos from iPhone/iPad to a USB Flash Drive with AnyTrans
Don’t Miss: iFunbox – Browse iPhone File System >
The Bottom Line
AnyTrans is the most direct and quick way to move photos from iPhone/iPad to flash drive. With the help of AnyTrans, you can always put your lovely pictures in the right place. If you have any questions about this post or AnyTrans, you can leave a comment or send an to tell us. Take a tour with AnyTrans now >
What's Hot on iMobie
-

New iOS Data to iPhone Transfer Guidelines > Tom·August 12
-

2016 Best iPhone Data Recovery Tools Review >Joy·August 27
-

2016 Best iPhone Backup Extractor Tools > Tom·August 16
-

How to Recover Deleted Text Messages iPhone > Joy·March 17
-

How to Transfer Photos from iPhone to PC > Vicky·August 06
More Related Articles You May Like
- How to Import Photos from iPhone to PC – This guide tells you a quick way to import photos from iPhone to PC. Read more >>
- How to Transfer Photos from iPhone to Mac – Read this post to know six ways to transfer photos from iPhone to Mac. Read more >>
- How to Transfer Photos from Mac to iPhone – Here you will know an easy way to transfer photos from Mac to iPhone without iTunes. Read more >>
- How to Transfer Photos from iPhone to Computer – This guide will tell you a fast way to transfer photos from iPhone to computer. Read more >>